Potatoes

Potatoes are hugely versatile and are a staple ingredient of many meals in one form or another – boiled, mashed, chipped or baked. Freshly dug and lightly boiled and eaten with salads they just can’t be beaten. It is great to be able to tell your dinner guests that you have grown what they are eating, and what better and more satisfying than new potatoes.
Now is the time to think about choosing and growing your potatoes; and with Seedy Sunday coming up at HoveTown Hall on Sunday 5th February (www.seedysunday.org) this is an ideal opportunity to choose your cultivars for next year.
Why bother to grow them some people ask, they are so cheap to buy. However, the selection in the supermarkets are pathetic compared with the many varieties of seed potatoes offered. (For inspiration go to www.edwintucker.com).
There are several steps to growing your own potatoes:
- chitting
- planting
- growing
- harvesting
Chitting – January-February
It’s vital with earlies and a good idea with maincrops to chit the seed tubers first before planting; this means allowing them to produce sturdy shoots. Buy your seed potatoes in late January/February and stand them rose end up (the rose end has the most eyes) in egg boxes or similar in a light, frost-free place. The tubers are ready to plant when the shoots are about 2.5cm (1in) long.
The aim of chitting is to produce plump, dark green or purple shoots about 1in/2.5cm long. Long, white shoots are a sign of too much heat and not enough light. If shoots are slow to appear, about 3 weeks before planting move the tubers to a warmer position for a couple of weeks and then back to the original, cooler place for the final week.
Planting – March – April
Seed potatoes should be planted around late March for first earlies, early to mid-April for second earlies and mid- to late April for maincrops. This varies slightly depending on where you are in the country. The word early refers to how quickly they mature, early potatoes mature in about fourteen to sixteen weeks, so from a March planting, you might be eating the first new potatoes by the end of June.
Its too late by this time to put manure on the beds as it needs to be done earlier, preferably in the autumn. When ready to plant, if you haven’t already manured, prepare the soil by digging and use fertilizer at the rate of 100g per square metre (3oz per square yard). Apply half of your fertiliser at this stage on the surface of the soil. The tubers are best planted in trenches with the remaining fertiliser in the bottom of the trench covered with a thin layer of soil. Dig a narrow trench 12.5cm (5in) deep. This can be lined with compost or even grass clippings for a better crop. Potatoes are planted to a depth of about 10-15cm (4-6”), about 30cm (12”) apart in rows 60 -75cm (24-30”) apart. The seed tubers are spaced 30cm (12in) apart for earlies and 37.5cm (15in) for maincrop varieties in rows 24in (60cm) apart for earlies and 75cm (30in) apart for maincrop. Sprinkle the remainder of the fertiliser between the tubers, as well as slug pellets or other slug deterrents,as keel slugs can be a problem.The tuber is planted on top of this with the sprouts facing upwards. Refill the trench to cover the tubers.
Growing
Potatoes need a sunny site away from frost pockets. It’s important to keep light away from the developing new potatoes as light turns them green and green potatoes are poisonous.
There are numerous ways of growing potatoes:
Once planted, when the stems are about 23cm (9in) high, start earthing up by carefully drawing soil up to the stems and covering to produce a flat-topped ridge about 15cm (6in) high. This can be done little and often or in one go.
Newly emerging foliage is susceptible to frost damage. You can prevent this by earthing up the soil around the shoots or by covering them with fleece.
The other method is to grow the potatoes under black polythene. The tubers are planted through the black polythene. The advantage of this method is that there is no need to earth up and the new potatoes form just below soil level which means there’s no digging to harvest them.
It’s also possible to grow them in large containers – or even black bin liners. Line the bottom 15cm (6in) of the container with potting compost and plant the seed tuber just below this. As the new stems start growing, keep adding compost until the container is full.
Keep crops well watered in dry weather; the vital time are once the tubers starting to form. A liquid feed of a balanced general fertiliser every fortnight can help increase yields.
Harvesting
First early potatoes should be ready to lift in June and July, second earlies in July and August, maincrops from late August through October.
With earlies wait until the flowers open or the buds drop; the tubers are ready to harvest when they are the size of hens’ eggs.
With maincrops for storage wait until the foliage turns yellow, then cut it and remove it. Leave for 10 days before harvesting the tubers, leaving them to dry for a few hours before storing.
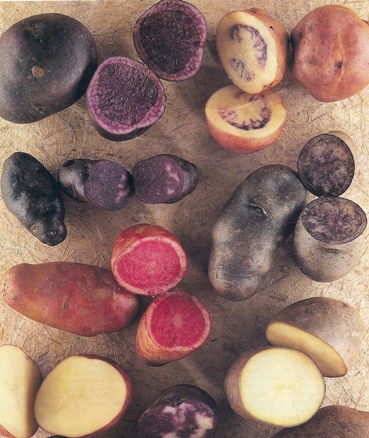
Choice of Potato variety
Potato growing, both organic and conventional, uses carbon at all stages. Tractor fuel for cultivation, spray application and harvesting. Cooled storage of ware and seed. In addition, conventional growers use synthetic chemicals as fertilizers and to control weeds, pests and disease.
Sarpo varieties are selected to grow without many of the interventions needed when growing other varieties. Specifically, weed control is not necessary unless the weed load in the soil is high as their vigorous foliage soon smothers weed seedlings. Control of aphids is rarely necessary as plants are resistant to aphid transmitted viruses. Tubers can be stored at ambient or moderate temperatures as natural dormancy is long. This adds up to very substantial saving of time, money and energy making the carbon footprint of the Sárpo crop one of the lightest of all potato crops, which is another really good reason for growing them.
These potatoes were first bred in Hungary and this has been continued in Wales where the Sarvari Research Trust looks for blight resistant varieties of potatoes. ‘Sarpo Mira’ and ‘Sarpo Axona’ have both become really popular with the home grower as they are virus and drought resistant and the slugs seem to keep away from them. They also store really well as they have a long dormant period. In the same family there is ‘Blue Danube’ which has blue skin and white flesh and is a good roasting potato. They also grow a waxy potato called ‘Kifii’, which they say tastes like a new potato but with disease resistance.
Other varieties to try recommended by the RHS include:
‘Accent’ AGM: A first early with creamy waxy flesh and good scab resistance. It’s a very tasty new potato.
‘Charlotte’ AGM: This is a salad potato, with yellow-skinned waxy tubers. Treat as an early potato.
‘Desiree’: A firm favourite with rosy skin and pale yellow flesh. This is a versatile maincrop potato.
‘Picasso’ AGM: A heavy-cropping maincrop potato with creamy skin and pink eyes. It has good disease resistance to scab.
In the days that lay between Christmas and the New year it is lovely to read though the list of potato varieties and sort out an order. I like to order from mail order as by the time they arrive I have usually forgot what they are and so it is a nice surprise.
Different varieties do different things; If your site is windy or exposed try the first early ‘Colmo’, with a low spreading foliage. The new second early, (plant these in April) ‘Bydand’ will also survive howling gales. If slugs are a really problem choose ‘Vanessa’ or Kestrel. On dry soils, ‘Aaran Pilot’, ‘Rocket’, ‘Estima’ and ‘Pentland Dell’ all survive and crop in summers when there is a drought.


No Comments
Add a comment about this page